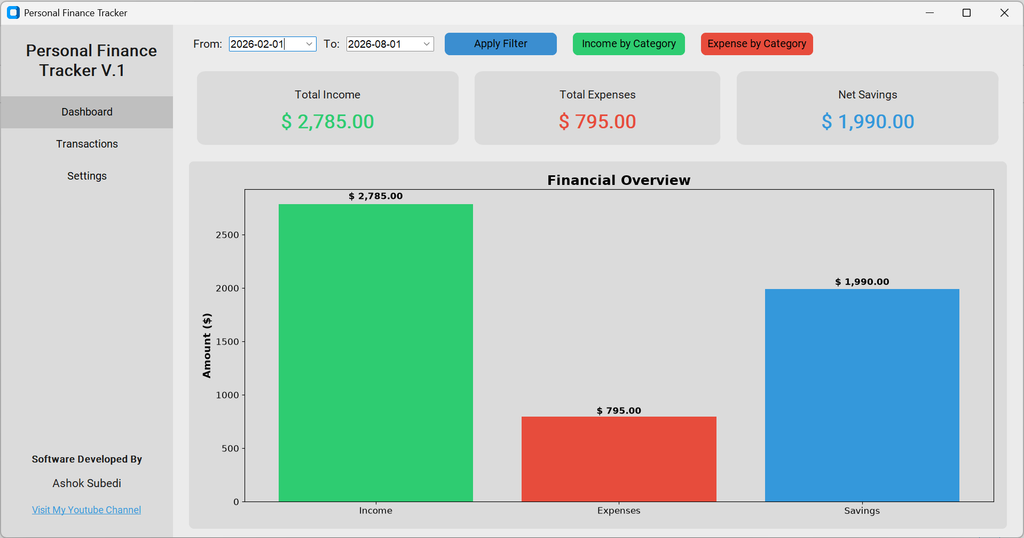
Personal Finance Tracker is a simple Windows application for managing personal income and expenses. It lets you record and organize transactions, view income, expenses, and savings through a dashboard, analyze finances by category, export records to Excel, and back up or restore your financial data.
Key Features
- Income & Expense Tracking – Record income and expenses with date, category, amount, and remarks.
- Financial Dashboard – View total income, total expenses, and net savings at a glance.
- Financial Analysis – Analyze income and expenses by category using charts.
- Transaction Management – Add, update, delete, and filter transactions.
- Excel Export – Export all transactions or selected records to Excel.
- Custom Categories – Create and manage your own income and expense categories.
- Date-Based Filtering – Analyze financial data for a specific date range.
- Backup & Restore – Back up your financial database and restore it when needed.
- Custom Currency – Set your preferred currency symbol.
- Light/Dark/System Themes – Customize the application’s appearance.
- Local Data Storage – Financial records are stored in a local database on the computer.
- License Activation – The software includes license activation and verification before use.
Operating Guideline
- Launch the Software
Open Personal Finance Tracker on your Windows computer. If activation is required, enter your license key and click Activate License.
- Set Up Preferences
Go to Settings and configure:
- Theme: Choose System, Light, or Dark mode.
- Currency Symbol: Enter your preferred currency symbol.
- Click Save Preferences.
- Create Categories
In Settings → Category Management:
- Select Income or Expense.
- Enter a category name.
- Click Add.
- Use Delete to remove an existing category when needed.
- Add a Transaction
Go to Transactions and enter:
- Date
- Type: Income or Expense
- Category
- Amount
- Remarks, if required
Click Save to add the transaction.
- View and Filter Transactions
The Transactions section displays your financial records in a table. Use the Type and Category filters to display specific transactions.
- Update a Transaction
Double-click a transaction in the table to load its details into the form. Make the required changes and click Update.
- Delete a Transaction
Double-click the transaction you want to remove and click Delete. Confirm the deletion when prompted.
- View the Financial Dashboard
Go to Dashboard to view:
- Total Income
- Total Expenses
- Net Savings
Select a From and To date and click Apply Filter to analyze a specific period.
- Analyze by Category
On the Dashboard, click Income by Category or Expense by Category to view a category-wise financial chart for the selected date range.
- Export Data to Excel
Go to Transactions → Export to Excel.
- Choose Export All to export all records, or
- Choose Custom Export to select a date range, transaction type, and category.
Select the location for the Excel file and save it.
- Back Up Your Data
Go to Settings → Data Management and click Backup Database. Choose where you want to save the backup file.
- Restore Your Data
Click Restore Database, select a previously created database backup, and confirm the restoration. Restart the software after restoring the database.
- Regular Use
For effective financial management, regularly record your income and expenses, review the Dashboard, and periodically create a database backup.
Video Tutorial
If you want to see video tutorial on how to operate this software and its features, watch the tutorial from below.
Software Download Link
To use this software, install it from Microsoft store by clicking on below link or you can search for “Personal Finance Tracker” in Microsoft store.

Inventory management template v 5 please