Power BI, Microsoft’s powerful business intelligence tool, offers a wide range of DAX functions to help users analyze and manipulate data effectively. Among these is the DATEDIFF function, a key tool in the Data Analysis Expressions (DAX) language that allows users to calculate the difference between two dates in a specified unit of time. In this article, we’ll explore what the DATEDIFF function is, how it works, and practical examples of its application in Power BI.
What is DATEDIFF function and its Syntax
The DATEDIFF function in DAX calculates the difference between two dates and returns the result as an integer in the time unit you specify, such as days, months, or years. It’s particularly useful for creating calculated columns or measures that involve time intervals.
The syntax for the DATEDIFF function is as below.
=DATEDIFF(start_date, end_date, interval)start_date: The earlier date in the calculation (must be a date/time column or expression).
end_date: The later date in the calculation (must also be a date/time column or expression).
interval: The unit of time to measure the difference in. Options include:
- SECOND
- MINUTE
- HOUR
- DAY
- WEEK
- MONTH
- QUARTER
- YEAR
Practical Examples of Using DATEDIFF in Power BI
Example 1: Calculating Total Months Worked by Employees

In the Employee Data table, there is information of Employee ID, Employee Name and Joining Date. A new column is added by using the DATEDIFF function. Which has calculated the months worked by the employee. The DAX formula used is;
Months Worked = DATEDIFF('Employee Data'[Join Date],TODAY(),MONTH)To change the unit of time to other (for example Year or Weeks), change the interval parameter to YEAR or WEEK.
Example 2: Calculate Days Taken for Order Delivery

In the Order Data table, there is information of order ID, Customer Name, Order Date and Delivery Date. A new column is added using DATEDIFF function which has calculated the Days Taken for Delivery. DAX formula used is;
Days Taken for Delivery = DATEDIFF('Order Data'[Order Date],'Order Data'[Delivery Date],DAY)If you want to display the time taken for delivery in hours, simply change the interval parameter to HOUR.
Example 3: Calculate Working Hours of Employees
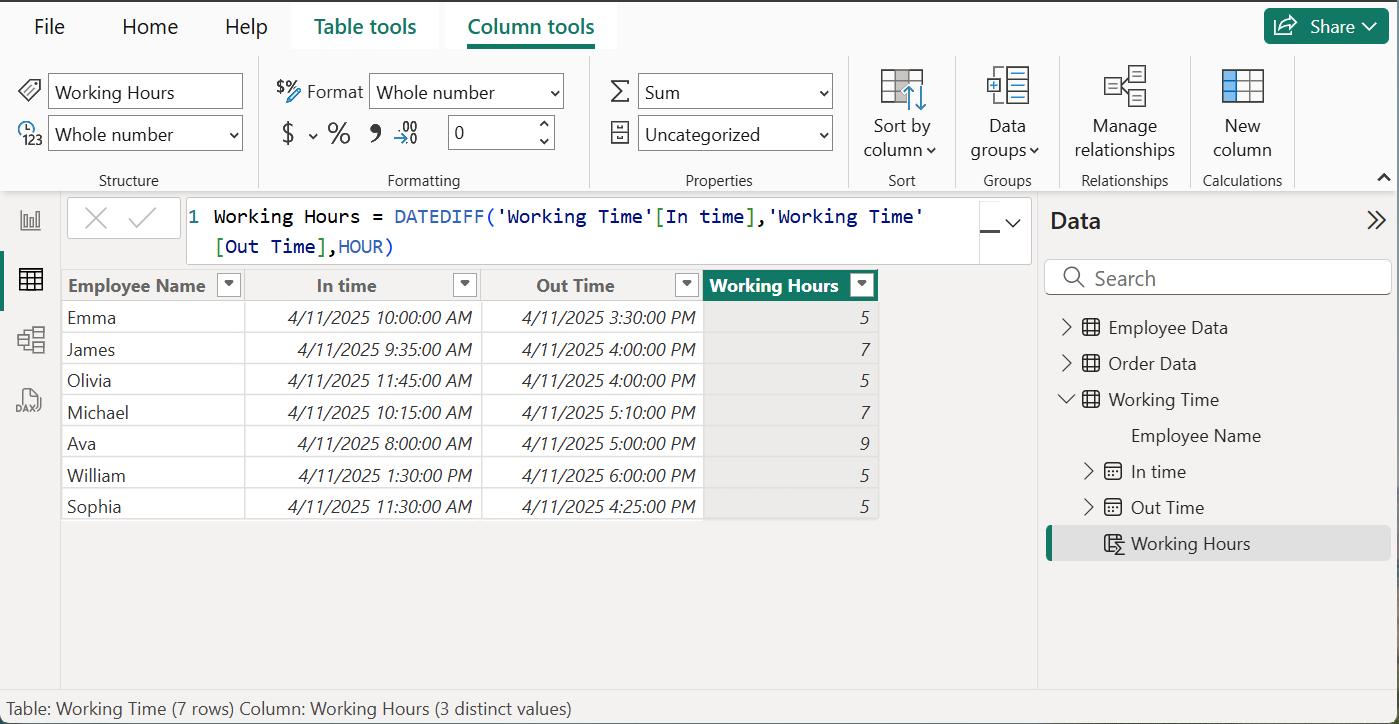
In the Working Time table, there is information of Employee Name, In Time and Out Time. A new column is created using the DATEDIFF function which has calculated the time worked in hours by the employees. The formula used is;
Working Hours = DATEDIFF('Working Time'[In time],'Working Time'[Out Time],HOUR)To display the time worked in minutes, change the interval to MINUTE.
Example 4: Create Measure to Visualize AVERAGE Working Time in Minutes
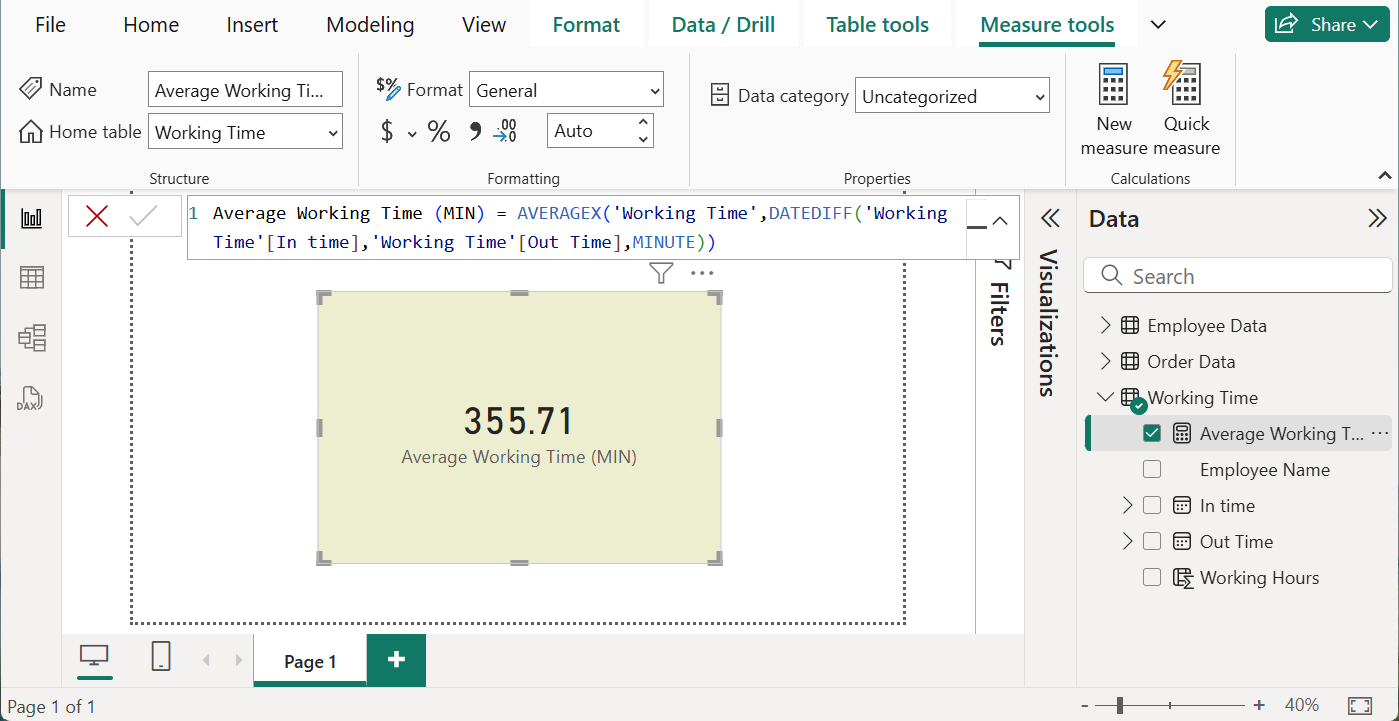
In Working Time table, a new measure is created using the DATEDIFF function to visualize the average time worked in minutes. The DAX formula used is;
Average Working Time (MIN) = AVERAGEX('Working Time',DATEDIFF('Working Time'[In time],'Working Time'[Out Time],MINUTE))Conclusion
The DATEDIFF function in Power BI is a versatile tool for analyzing time-based data, offering flexibility across various intervals like minutes, hours, days, months etc. By integrating it into calculated columns or measures, you can unlock valuable insights into durations, trends, and performance metrics. Experiment with it in your next report and see how it transforms your date into valuable insights.
Practice Data & Additional Learning Resources
If you want to practice DATEDIFF function in Power BI, download the sample Excel Data file from below which you can connect to poser BI and start practicing.
If you are beginner in Power BI, watch our YouTube video tutorial series for the beginners. Click on below playlist to watch.