This tutorial shows how to auto-highlight the active row and column in all sheets of a workbook in Microsoft Excel. You can do this with a single click in the latest version of Excel using the Focus Cell tool. However, this tutorial is designed for users who are using an older version of Excel.
Auto-highlighting the active cell’s row and column is useful when working with large data. It clearly identifies which cell, row, and column is currently active. In presentations, the audience can clearly see the column or row headers of the cell being discussed.
How to Do Steps
Follow below given clear steps to do this in Excel.
- Open your Excel workbook.
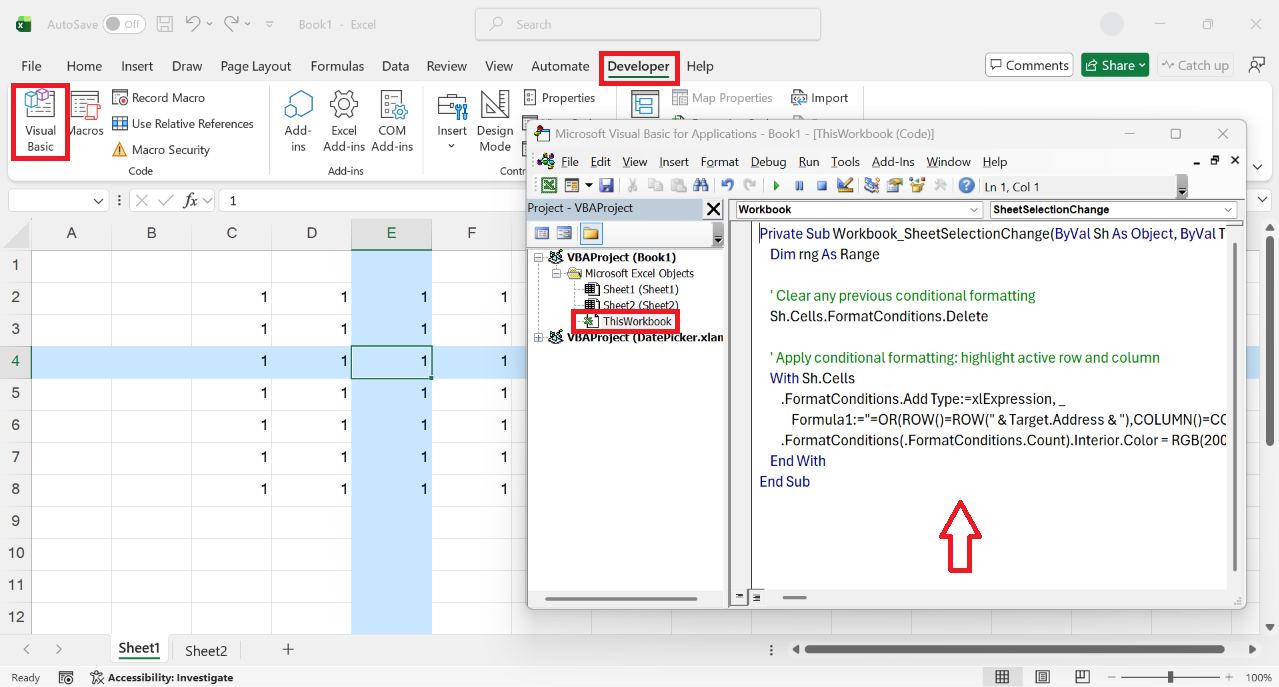
- Open Visual Basics for Applications (VBA) by going to developer tab, then visual basic. (Alternatively you can open VBA by pressing Alt + F11.
- In VBA window, double click on the “This Workbook” located at the project window (located at left).
- In the module section (the big white area), copy and paste the VBA script that is given below.
- Close the VBA window, click on any cell, then the active cell row and column gets auto highlighted.
See below given image for more clarity.
VBA Code
The VBA script needed is given below. simply copy it and paste in the workbook module.
    Private Sub Workbook_SheetSelectionChange(ByVal Sh As Object, ByVal Target As Excel.Range)
    Dim rng As Range

    ' Clear any previous conditional formatting
    Sh.Cells.FormatConditions.Delete

    ' Apply conditional formatting: highlight active row and column
    With Sh.Cells
        .FormatConditions.Add Type:=xlExpression, _
            Formula1:="=OR(ROW()=ROW(" & Target.Address & "),COLUMN()=COLUMN(" & Target.Address & "))"
        .FormatConditions(.FormatConditions.Count).Interior.Color = RGB(200, 230, 255)
    End With
End Sub
Important!!
If you want to save this feature permanently in the workbook, you need to save the workbook as macro enabled Excel file. For this, follow these steps.
- Click on “File” tab.
- Click on “Save As”.
- From the file type drop down, select “Excel Macro Enabled Workbook” (.xlsm).
- Choose the location and save the file.
Later, to use the auto highlighting of active row and column feature, open the macro enabled version of the file.